2010-07-31

Gordy's Camera Straps


Concept: 3 out of 5
Execution: 3 out of 5
Yeah, but: Is this whole review just an excuse for camera bondage pr0n?


The Long Version: I've always been a bit particular - peculiar? - about how I carry my cameras. I almost always prefer wrist straps, finding it both easier and safer to hand-carry a camera and heavy lens instead of slinging it from a neck strap. And since most commercial wrist straps are either little stringy things with quick-releases for P/S digicams, or made with uber-wide webbing that looks like it wants to be a neoprene cuff bracelet, I've always wound up making them myself from various lengths of cord. They work well, but they look as cheap as they are.


Enter Gordy's Camera Straps.


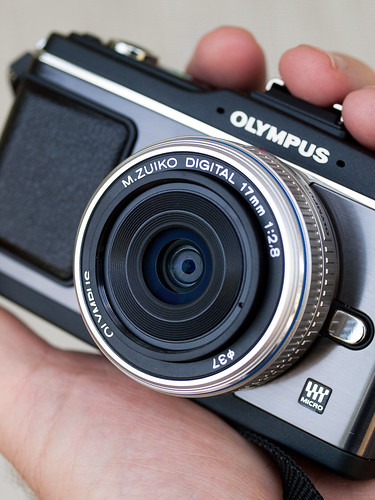
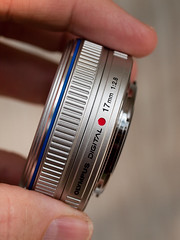
Gordy's straps are hand-made of quarter-inch leather with waxed polyester binding, and there are four leather colours and ten choices of wrapping cord. If there's more than one piece of material involved, then the colours can be picked individually. There are two main attachment methods, either a string that won't wear down the camera's finish, or a split-ring ('lug') attachment that can use different types of camera-protecing 'bumpers'. The photo above shows the Integral bumper; there are both leather and rubber options that aren't built-in but provide more protection. There's also a tripod-mount attachment for a sling-style strap and a tripod-and-lug vertical attachment, which hangs the camera vertically and looks very cool for rangefinders with an offset tripod mount. Going through Gordy's web site is fun and easy.


The first strap I ordered is a black wrist strap with a black string attachment and red wrapping cord. The leather is fairly stiff right out of the envelope - worldwide shipping is included in the website's prices - but works in nicely. However, it's never going to be as supple as the attachment string, so that's where the flex and movement comes in. As I see it, there are two big advantages to the string: it can't damage the camera's finish, and it makes the strap very thin where it attaches to the camera. For bigger bodies with attachment lugs at the top, like Canon's SLRs and many Nikons, this doesn't matter much. For others, especially ones with smaller bodies and lower lugs, a thick strap will interfere with the grip of a normal human. Panasonic's GH1 almost falls into this camp, and the modern-classic Zeiss Ikon rangefinder is hopeless.


I've used my Ikon with the string wrist strap, but the absence of a protruding grip makes it hard to hand-carry for any length of time. So once I'd seen the quality of Gordy's work, I ordered a single split-ring neck strap with a nearly Zeiss-blue wrapping cord. I was really tempted by the lug-and-tripod vertical design, but since it wouldn't let the camera sit upright, I decided to pass on it no matter how appealing it might seem. The other concern that I had is related to the thickness of the leather at the attachment point, and as I suspected it's too much to let me attach the strap to the right side of the camera. Putting it on the left side solves that particular issue, with an added benefit as well. When I don't want to carry the Ikon over my neck or shoulder, I simply use the strap as a long tether to my right wrist. The rubber O-ring lets me snug it up nicely and makes it perfectly secure. I used to carry the GH1 the same way - on a long shoelace - simply because it keeps the wrist strap from falling across the viewfinder/LCD when I'm using the 'portrait' orientation. Since I still prefer to hand-carry the Ikon when I'm actively using it, the single attachment point absolutely perfect.


Despite the name, I'll almost never put a neck strap around my neck. Our necks aren't really designed to carry heavy weights, and let's face it: a camera looks kind of foolish bouncing off of decidedly non-washboard abs. The moderately rough inner surface of the leather makes it too grippy to sling the camera diagonally, but in exchange the strap does stay where I put it reasonably well. When I'm working with a second camera - typically a digital one that's doing the scouting - my favourite way to carry the Ikon is from my left shoulder, and with the rubber o-ring stopper tightened up it's very secure. I can practically do a callisthenics routine with it carried that way, and when the camera does start to slip a bit, it's close at hand to re-snug.


The length of the straps isn't adjustable - except for one neck strap design - but it can be chosen either from a couple of options (wrist strap) or specified to whatever length you like (neck strap). I have the standard-sized wrist strap and a 45" neck strap, and have been happy with both. I have complete confidence in their strength, and had no problem letting my brand-new Zeiss Ikon dangle from my wrist when it came time to dig out a new roll of film. I will concede that I haven't been using them for very long - expect an update in a few months - but I'm much happier with them than any commercial strap that I've used. Gordy's straps may not have a Billingham-level fit and finish, but they don't have the Artisan and Artist price burden either. I'm a fan of the hand-crafted aesthetic, and really enjoy the personality that they bring to these machines.


There may even be a third one in my future.


2010-07-26

Corrugated Plastic Sheets


Concept: 3 out of 5
Execution: 2 out of 5
Yeah, but: Not to be confused with chloroplast.


The Long Version: I have to admit that I love this stuff. True, like most plastics it's a massive environmental problem and the scourge of marine environments everywhere, and its ubiquity for cheap advertising signs makes it an urban - and suburban - blight as well, but it's also extremely handy. 'Coroplast' is the Xeroxed Kleenex of the corrugated polypropylene copolymer world, and since that's what the sign said where I bought mine, that's what I'll call it here. Other companies do make it, and call it different things, but who has that kind of time?


It's lightweight, rigid, and cheap. Right there we know that politicians and advertisers are going to flock to it, so it's a staple for lawn signs and anything else that needs a weatherproof printed surface. It comes in more colours than a CRT-iMac, and can be used for all kinds of interesting things. There's low-cost greenhouses and office dividers, but also for all kinds of DIY projects like model airplanes and small animal cages. Who knew? But by far the most interesting thing is how handy it is for photography.


I have a large sheet of translucent white Coroplast that I'll use as a background or a diffuser, and a smaller sheet of opaque black that I'll cut up for black cards. My most inspired move was to stack and bundle the black plastic to make a grid for my SB600; the initial proof-of-concept hack job has been so effective that I haven't bothered to make any others. (For anyone who's wondering, it's being held together with my favourite adhesive.) The photo above is being lit by three strobes, with one on the camera and another underneath the white plastic to brighten it up a bit. Thanks to the marvel of Nikon's AWS/CLS speedlight integration - similar abilities can be found in many Olympus cameras and a mighty one Canon product - this is an incredibly easy way to create a simple light box. That's how I took all of the product photos for my 20/1.7 review, like this next one that would have illustrated a part about using the lens with a three-stop ND filter.


The biggest problem with Coroplast can be finding it and getting it home. Most craft and art supply stores in Toronto seem to be selling it these days, and if they don't, there's always sign supply places. The real trick is to find it in pieces smaller than thirty square feet, but the good news is that a simple knife can solve some of the transportation problems. After that, it just takes a couple of light wipes to get rid of the ever-present dust and it's ready to go. It's light, rigid, durable, whiter than foamcore and more cleanable than bristol board. It's not the only thing I need for my home studio, but I use it for a huge amount of the photos that I take for these reviews, even if you can't see it.


2010-07-17

Zuiko Digital ED 40-150mm F4.0-5.6 with MMF-2

Adapter, Lens, and various coverings
Concept: 4 out of 5
Execution: 1.5 out of 5 (0 out of 5 for the MMF-2 alone)
Yeah, but: An odd-ball hybrid, neither fish nor fowl.
The Long Version: Earlier this year, Olympus released a micro four-thirds hardware mash-up consisting of a regular four-thirds kit zoom lens and an adapter for use on the digital Pen E-PL1 (and ostensibly for the E-P1 and E-P2). For the budding Pen lens line, it was a great idea; take an existing 4:1 kit zoom from its standard four-thirds grade lineup, match it with a four-thirds to micro four-thirds adapter, give it an enticing bargain price, then pitch it towards the market segment that would also be interested in purchasing the E-PL1. And that's what Olympus did with the Zuiko Digital ED 40-150mm F4.0-5.6 and the MMF-2 four-thirds to micro four-thirds adapter.


The Big Box that the adapter and lens arrived in

As I said, as a concept, it's great, especially when you consider the costs of the individual items. The zoom lens' official MSRP is $279, while the adapter's official MSRP is $199. The combined cost, if bought from Olympus, would set you back some $380. Olympus sold the two of them together for a mere $199, essentially giving the zoom away with the purchase of the adapter. What probably sealed the deal for Olympus is the fact that the current 40-150mm kit lens was designed to work effectively on Olympus DSLRs (E-4x0, E-5x0, E-6x0 and E-30) using their variant of contrast detect autofocus (CDAF) while those DSLRs were in live view mode.

As the old saying goes, it if sounds to good to be true, it probably is. In this case the too-good-to-be part was the adapter.

MMF-1 vs MMF-2 Top

The original Olympus four-thirds to micro four-thirds adapter (on the left, above), the MMF-1, was released along with the first digital Pen, the E-P1. Like the E-P1 and E-P2, it was a small precision part, manufactured to a high quality standard. Light enough to add little weight-wise to an adapter four-thirds lens, but with enough heft to communicate a feeling of quality, from the metal mount on the front to the metal bayonet on the back, you just knew the MMF-1 was something you could depend on. Not so with the MMF-2.

When the E-PL1 was released, Olympus replaced the MMF-1 with the MMF-2, and for the same price of $199. And that's unfortunate; while the MMF-1 had metal in all the right places, the MMF-2 is totally plastic in construction. After using this combination on my E-P2 for the last three months, I've noticed that a small deformation has formed on the bayonet lock hole. This is the hole into which the mount's lock pin inserts when you twist the lens into place. The deformation is on the side that strikes the pin when the lens comes to a stop. There's only one other spot I've seen this, and its on the zoom lens' plastic bayonet.

Plastic lens bayonet of the 40-150mm MK II

I'm not against the use of plastic in cameras. Material science has advanced tremendously so that many plastics provide a better, lighter weight, and stronger alternative to metals. The problem is that the type of plastics Olympus chose for this application is inferior to the use of metal. My advice: if you're in the market for just the adapter, then buy Panasonic's DMW-MA1 four-thirds to micro four-thirds adapter. The Panasonic adapter is metal front and back, and can be purchased from most retailers for a little more than $100, or half the price of Olympus' inferior offering.

Moving on to the second item in the combination, we come to the Olympus 40-150mm ED kit zoom lens. This zoom, along with the 14-42/45mm zoom, has been a kit stalwart since the early days, first showing up with the Olympus E-300 (my first four-thirds camera). This version, dubbed unofficially as the Mark 1 version, was solid, a bit large, and gave good performance for what it was; an inexpensive 4:1 telephoto lens for the masses.

But time and technology marched on; when Olympus introduced the E-4x0 and E-5x0 mid-range DSLRs, they revamped both kits to be smaller and lighter, shortening the range of the 14-45mm to 14-42mm, while drastically decreasing the size and weight of the 40-150mm and dropping the max aperture at 40mm from f/3.5 to f/4 in the process. They also added a circular aperture and a single ED glass element. The final result for the 40-150mm was a lens that, when zoomed into 40mm, fit easily into the palm of your hand.

Zoomed out to 150mm it's a different matter; at that focal length the zoom is physically over twice as long as it is at 40mm and a full stop slower at f/5.6. But that's no problem, as the lens is still easy enough to handle, and the front element stays in a fixed position regardless of zoom length or focus distance.

40-150mm MK II fully extended

The 40-150mm is meant to be a "cost efficient" lens, or in an earlier time, a budget lens. And for what it costs in the regular market (around $115), it's probably one of the best little budget zooms you can purchase. But make no mistake, it's a budget lens; the only non-plastic components in the lens are a few bits of metal contacts, the focus motor, and the glass. The rest is spare plastic that has been designed down to a bare minimum.

Comparison of three Olympus zooms

In my collection of Olympus glass I'm fortunate to have the outstanding 50-200mm f/2.8-3.5 High Grade zoom lens. Mounted on my E-3, it represents the standard in my personal collection for image quality and general performance. And in that regard the 50-200mm walks all over the 40-150mm. But as you can see in the illustration above, the 50-200mm, on the left, dwarfs both the 40-150mm (center) and the 14-42mm collapsible micro four-thirds kit zoom (right). On size alone, the 40-150mm is the kind of lens you carry with you on impulse; the 50-200mm is the kind of lens you plan to use in advance. And keep in mind the 50-200m costs roughly five times the cost of the 40-150mm and MMF-2 combination, ten times considering the 40-150mm alone.

How well does it perform in real life? Because the 40-150mm is not a native micro four-thirds lens, its autofocus performance is slower than either the 17mm or 14-42mm kit lens, especially at 40mm. Further out into the range up to and including 150mm, the 40-150mm is almost as fast in focus performance as the micro four-thirds standards.

When it comes to optical performance, the 40-150mm provides good (and some may argue excellent) performance for the cost of the lens. It's no 50-200mm, but for what it costs it's more than Good Enough.

Rush Hour Homeward Bound

Urban Section

Oleander after the rain

Two inspect, one waters B&W Cropped

In summary, the two items together fall down a bit, especially if you already have the more upscale E-P2. And that's a shame, really, because the combined size and weight of the two is light enough that it makes a decent companion worth having in the bag.

There are several alternatives to this kit, especially if you're on a tight budget. The first is to look at the Panasonic Lumix G Vario 45-200mm F4-5.6 telephoto zoom lens. The Panasonic is larger and longer than the Olympus combination and the price of the Panasonic is higher, floating between $300 to $350 dollars on the open market. If you want to spend closer to $200, then purchase the Panasonic DMW-MA1 adapter (around $100) along with the Olympus 40-150mm zoom from someone else other than Olympus; Amazon has the Olympus zoom for $130, while B&H Photo has it for $112. The combination of the two separate items, while costing slightly more than the Olympus combination, will give you much better overall quality, especially with regards to the adapter, while preserving the combination's overall compact size.

Update

I should have checked my sources before writing about my dislike of plastic lens mounts. And I should have gone shopping at Walmart. But first things first.

Andrzej Wrotniak has an extensive site devoted to Olympus, including the E series of digital cameras, ranging from the E-1 up to and including the E-P2. In 2007 Wrotniak wrote a review of his own copy of the E-510, in which he noted the fact that the 40-150mm kit zoom, the same version written about above, had been introduced with the E-510 and had a plastic mount. Wrotniak had this to say about plastic mounts:
Nothing, however, comes free. To trim the weight, Olympus engineers had to reduce the use of metal in these lenses, up to using plastic lens mounts. While something makes me to abhor this very idea, I understand the reasons behind it: attaching a metal bayonet to a totally plastic construction would only move the point of mechanical vulnerability from the bayonet itself to the screws securing it to the rest of the lens. Anyway, only time will tell how does the plastic mount affect long-term reliability and precision of these lenses.

To be impartial: almost all other manufacturers (except for Pentax) have been using plastic mounts in their "kit" lenses for a few years already; Olympus was, as far as I know, the next-to-last Mohican.
And sure enough, while shopping for groceries at a near-by Walmart, I cruised by the electronics section (to satisfy the inner geek) before hitting the grocery side. And right there, in the small camera section, were two zoom lenses, one from Nikon (Nikon 55-200mm f/4-5.6G IF-ED AF-S DX VR) and one from Canon (EF-S 55-250mm f/4-5.6 IS), both with plastic mounts.

So I guess I should get over my bias towards plastic lens mounts, especially in Olympus, since "everybody is doing it." But I still stand by my assessment of the MMF-2. If you can find the Panasonic adapter for around $100, then buy it over the Olympus.

Olympus M.Zuiko Digital 17mm f/2.8

E-P2 w/17mm mounted
Concept: 4 out of 5
Execution: 3 out of 5
Yeah, but: Inexpensive and a blast to use.

The Long Version: If you're a reader of this blog you've no doubt read Matthew's earlier review of the Panasonic Lumix G 20mm F/1.7 ASPH. Matthew described the 20mm as "perhaps the single best lens available for micro four-thirds cameras." There's no denying that at a maximum aperture of f/2.8, the Olympus pancake is a good stop-and-a-half slower than the 20mm at f/1.7. And coupled with the GH1, the combination is, again quoting Matthew, "a dominant force in the mirrorless market segment." High praise indeed.

I'm not here to counter points that Matthew makes in his review. It's in bad form (I am, after all, an invited guest blogger) and it's pointless. The 17mm is matched for the Olympus Pen series (currently the E-P1, E-P2, and E-PL1) in much the same fashion that the 20mm is matched to the Panasonic line of micro four-thirds cameras. Both the 20mm and 17mm, measurebation and specifications notwithstanding, are for all practical purposes equally capable instruments when used competently.


Holding the M.Zuiko 17mm pancake for mounting

The 17mm, like it's Panasonic cousin, is a minor marvel of engineering. At 57mm diameter by 22mm length, and weighing a rather wispy 71g, it's almost too small to comfortably hold. When it's mounted on one of the Olympus digital Pens, the combination fits comfortably in the palm of my hand, and is small enough to easily slip into a jacket, coat, or (if you're wearing cargo pants or shorts) small enough to fit into a large pants pocket. Its equivalent 35mm focal length is 34mm; in days of yore when I shot film with primes, the 35mm lens was my favorite focal length, allowing me to include more of the world in my photographs without the undue distortion of wider angle lenses such as the 28mm or 24mm. In its own way purchasing the 17mm was like coming home again.

The 17mm is constructed primarily of plastics (or "composites" as they're called in some quarters), which includes the focusing ring, outer lens body, and front facing elements (but not the front lens). The mount is well-machined and chromed metal; it mounts smoothly and tightly on my E-P2, with no play or wiggle once mounted. The plastics used in the lens are of excellent quality, with crisp molding across the entire lens. In spite of the extensive use of plastics (or perhaps because of it) the feeling of the 17mm is one of quality and precision, in keeping with the E-P2 body.

With the latest firmware available for the digital Pens, the 17mm is quick and accurate to automatically focus on just about any subject, or in my case, on every subject I've taken with the lens to date. The only problem regarding autofocus with the 17mm is the same problem you'll find with the M.Zuiko 14-42mm kit lens; autofocus noise. For stills it's not an issue. For video it's noisy enough to be heard on the audio track. I'm certainly no expert on video photography; when I use the E-P2 and 17mm for video, I don't use continuous autofocus, prefering instead to compose, then let the camera single focus on the subject, then record. Nothing annoys me more than to see a camera hunt for focus lock on a video. And if you must have silent continuous autofocus, then Olympus has two new silent focusing micro four-thirds lenses for you to choose from; the M.Zuiko Digital ED 14-150mm f4.0-5.6 tele-zoom and the M.Zuiko Digital ED 9-18mm f4.0-5.6 UWA zoom.

The injured bird

The E-P2 and the 17mm combine to create an almost sublime picture taking machine, a device that melts into the hand, that's so small and unobtrusive that it gives a sense of intimacy with the world that is almost impossible to achieve with a regular DSLR such as the Olympus E-3 or its many similar kindred. Big cameras enslave you to a particular regimen with regards to photography; put the camera up to the eye in front of your face, between you and the world, spend critical moments manipulating the camera, then record the image. With the E-P2 and 17mm, I can hold the camera away from me, then use live view out of the corner of one eye to judge basic composition while keeping the majority of my attention on the world in front of me. The injured pigeon above was taken with my hand and the E-P2 less than a foot away, in my hand, while I kept the rest of my body away from the bird in order to minimize spooking it.

Fallen Angel

And sometimes its good to be able to hold the camera away from the body; while attempting to photograph the hawk, I held the E-P2 in front and above the subject while I kept a weather eye on the multiple lanes of traffic that kept passing by me at every green light.

Ruby Resting

When I purchased the E-P2 in December of 2009, I purchase it in a kit that included the 14-42mm kit zoom and the VF-2 electronic viewfinder. For a time, I used the VF-2 almost religiously, aping my SLR/DSLR technique of holding the camera in front of my face. The 17mm has broken me of that habit, allowing me to continually approach a subject unobtrusively, seeking the best point of view without looking like a hunched over idiot and drawing attention to myself. With the 17mm on the E-P2, I can quietly and quickly take those special moments without physically intruding and thus disturbing the moment I'm trying to capture.

So is the 17mm good enough to invest in? Absolutely. Although it isn't cheap, it's cost is much less than the 20mm, allowing you an easier entrée into a whole different technique of photography, allowing easy and experimental perspectives for photographing the world around you, a way to more closely inspect the world around you. Both pancake lenses are superb, and will reward the user when used properly. Which one you choose comes down to purely a matter of personal taste and/or budget.

Loving wife, mother, Nana

2010-07-16

Old Crow Medicine Show Concert, Toronto, 13 July 2010


Concept: 3 out of 5
Execution: 4 out of 5
Yeah, but: Yes, I like Bluegrass. Is there a problem?


The Long Version: Concerts in particular, and music in general, are things that I really shouldn't review. I hardly ever go to concerts, don't really know anything about them, and yet somehow I've been to three of them in the past nine months. Each one has been a lot of fun and very loud, but it's hard to compare them since the genres have been so different. Still, one of the great things about the internet is the universal ability for people to speak beyond their authority - and it's far too late for me to stop doing that now.


Old Crow Medicine Show is a band that's a little tricky to pin down. They're a string band with at least a couple of banjos, acoustic guitars, and an occasional harmonica as well. A couple of cowboy hats were in evidence, but nobody was trying too hard: they certainly look a lot like a Bluegrass band. And of course they sound like a bluegrass band as well; I have to admit that listening to Willie Watson speaking reminded me of Boomhauer on King Of The Hill. I don't know if he was just mumbling through muddy speakers or if it was a legitimate accent, but dang ol', man, I could barely make out a word he said.


But just the same, this is far from a traditional jug band. They're decidedly modern, with roots as solidly in rock and roll as in bluegrass. So while there were some loud "yee-haw!" noises coming from the audience, it was hardly a New Country revival with wall-to-wall white suburbanites wearing snakeskin boots and checkered shirts over their Garth Brooks Souvenir Belt Buckles. It was more wall-to-wall pale folks in ball caps and the occasional sex pistol t-shirts, who might also listen to Nirvana or reggae in their spare time. What can I say? I fit in okay.


The doors to the very large, very dark main room at the Phoenix Concert Theatre opened at 7pm, and the band came on at twenty after eight. There was no opening act, just a solid hour of music followed by a bar break. Old Crow came back on again and played hard for about another hour and a half; the show wrapped up after a single encore slightly before eleven - just about right for a Tuesday night. Here's the setlist for the show at the Pheonix; songs that I didn't recognize and haven't been able to track down are simply left with a placeholder question mark, those marked '*' have been added with thanks to the thread at Old Crow Fans.


• Hard to Love
• Down Home Girl
• I Hear Them All
• Wheeling Breakdown (Instrumental)
• My Good Gal
• Humdinger
• Caroline
* We're All in This Together
• Next Go Round
• My Bones Gonna Rise Again
• Gospel Plow
• Big Time in the Jungle
• Minglewood Blues
Break - 30 minutes
* Shortnin' Bread
• Alabama High Test
• Let It Alone
• Highway Halo
* Trials & Troubles
* Raise a Ruckus
• New Virginia Creeper
* Reubins Train
• Mary's Kitchen
• Four Strong Winds (a Canadiana song written by Ian Tyson)
• Crazy Eyes
• Hard to Tell
• CC Rider
• Wagon Wheel
• Tell It To Me + band intro
Encore:
* Cowgirl in the Sand
• Fall On My Knees
• Tear It Down


There's lots of places online to hear anything from snippets to full songs, so I won't worry too much about describing the music. I like it, others won't, and that's life. What really impressed me at the concert was the sheer power and enthusiasm of the musicianship. It was stunning to watch them play - whether it was on a banjo, mandolin, or acoustic guitar, their fingers were often blurred to the point of invisibility. Ketch Secor shredded the bow for his fiddle during the first half, came back from the break with a new one, and had it shredded by the end of the show as well. Poor Willie Watson had to replace and tune a guitar string during the band intro. While Secor and/or Watson sing most of the main vocals, everyone but Morgan Jahnig – who had his hads full with the Upright Bass – lead at least one song. This is a very talented and hard-working band.


There were a couple of people in the audience - literally, two of them - hooting all night for 'Crazy Eyes', which surprised me because I've never particularly cared for it. On the other hand, I would have loved to hear 'Take Em Away' and 'Methamphetamine', which somehow didn't make it into the set. But hearing 'Hard To Tell' and 'Tear It Down' live was awesome, with huge energy from the audience, and 'Wagon Wheel' was probably the biggest hit of the night as a giant sing-along. The two blatant ode de pénis songs weren't quite as popular with the two women to my left, but upbeat numbers like 'Humdinger' kept us busy fending off drunken dancers for most of the night. Good times.


Having seen the band roaring through their two-plus-hour set, and knowing who's doing what, has made me like their recorded music even more. When hearing voices in harmony, I can now picture them singing together instead of suspecting that they're layering tracks in post-production. And while many of the songs were played faster at the show, I can absolutely imagine them rocking just as hard in the recording studio.


Next time they're here, I'll be there.


2010-07-15

Honeywell Turbo Fan


Concept: 3 out of 5
Execution: 3 out of 5
Yeah, but:The Old Version Was Better, Except For...

The Long Version: After trying different fans over the course of many years in the music business, I started noticing several of my drummer friends using this same model of Honeywell "Air Circulator" with "Turbo Force Power".
It's small and therefore doesn't take up much space onstage or in your vehicle.
(11" high, 7" diameter 3-blade rotor)
The airflow can be adjusted from horizontal to vertical, which is also perfect for stage use.
3 speeds, the highest of which is rather astonishing and must not be pointed towards an open microphone lest you hear some serious wind rumble from your subwoofers and have to buy a windscreen, which won't help much.

I've been a huge fan of this "Air Circulator" for 10 years at least, and have just bought my fourth or 5th one, as seen below on the right:


Going back to the top photo, you'll notice that it's now 25% Quieter.
I agree.
In fact, using my digital decibel meter I came up with the following:
(C-weighted & Slow Response settings, measured 6" behind the fan to eliminate wind noise)

Old Fan:
Slow Speed = 71db
Medium = 73db
High = 76db

New Fan:
Slow = 67db
Medium = 70db
High = 73db

To make this comparison valid it should be noted that the day I brought home the new fan, I disassembled the old one and gave it a good cleaning, including the motor which also got some new lube.
Essentially they are the same age now, or as close as it's possible to make them.
More on this later.

Looking at the db readings, you can see that the new design is quieter at all settings.
Since decibels are a logarithmic scale, and an increase of 10db equals double the perceived volume, "25% Quieter" is a pretty accurate claim.
But is it odd that the new fan's medium speed is the same volume as the older version's slow?
Not really, because the new fan's medium speed puts out the same amount of air as the old one's slow.
Likewise, the new fan's high speed = medium on the older unit.

The new version runs slower, and therefore quieter.
For household use, this is fine.
If you're in a band, work in your garage a lot, or don't have air conditioning, this reduction in power gets a big thumbs down.
When you really need the big blast of wind that used to be found on the highest setting, be advised that it just isn't there anymore


Getting back to having cleaned and lubed my older fan for the decibel test--another feature mentioned on the box is "Removable grille for easy cleaning".
To me, this was always an important feature since I use these fans in our home 24/7, and quite often in smokey bars or on dusty outdoor stages.
When the blades get heavy with nasty stuff that adds weight, they spin slower.
Also, when the grille gets clogged with dust-bunnies and hair the flow is blocked.
Thrice a year I blow out the accumulated dust and gunk with my air compressor (or leaf blower) and every summer I take them apart for a complete cleaning and motor tuneup.
But when I tried to take apart the white(ish) one a few years ago, I discovered a design change had been made.
Two of the six screws that secure the grille had been changed from Phillips head to Allen Security head, so you needed a special (hard to find) hex wrench with a hole in the center to accomodate the security pin!
This fastener is highlighted below, in a chart I found at Intructables:
(click to enlarge)


I remember being furious!
My fan was in desperate need of servicing, and I was locked-out!
So I used a Dremel tool's cutting wheel plus an ExActo knife to completely remove the offending screws and all the surrounding plastic, too!
Security Screw YOU, Honeywell!

It's funny that they now consider this a noteworthy feature when a few years ago their legal counsel decided that it was a liability.
Looks like I wasn't the only one who was offended and angered.
It's a stupid fan, not a Wii.
Only 17.3% of the population is dumb enough to get hurt while opening up a fan to clean it, or so I've heard.


The fan's base has been scalloped front and back, which might make it easier for air to reach a place where it can be circulated, but I'm going to go out on a limb and say that this is to save a few cents per unit on plastic and shipping weight.

There are now two keyholes (vs 1) on the base for mounting the unit on a wall.

Bottom line is that the new black fan is for the house, and the older white one is for work.
I'm going to try and keep it running for as long as possible, to enjoy it's higher velocity airflow.
My suspicion is that the motors are the same and that the only difference is in the high/medium/low switching circuitry, which means that I can hopefully keep the older one blowing harder for years to come.

The fan blades spin clockwise--the CCW spiral grille seems to counter their turbulence which results in very smooth output that can reach long distances.
This small Honeywell Air Circulator's retail price varies from $20 in the springtime to $12 in mid-summer, to as low as $5 at clearance in the early fall.
Larger versions are available, and they offer some incredible airflow.

2010-07-12

Kleen Kanteen Insulated Stainless Steel Bottle


Concept: 3 out of 5
Execution: 4 out of 5
Yeah, but: Less is cooler, but still less.


The Long Version: I really hesitated before buying this. After all, the standard 27oz/800mL Kleen Kanteen stainless bottle that I use every day - reviewed two years ago - has outlasted every other water bottle that I've tried. Did I really want to ad another one to the collection that I don't use, or conversely, do I want to risk buying one that will retire the grand-daddy?


I pondered for several minutes, standing there in the store, and then parted with the $28 (plus tax) that the new 20oz/600ml Kleen Kanteen Insulated cost.


I've been using the new bottle for a couple of weeks now, and it has quickly become my favourite. The biggest weakness of all metal bottles, such as the more traditional Kleen Kanteen, is that their contents warm up very quickly, they sweat in humid weather, and can't hold anything hot. Alright, maybe that's three weaknesses, but they all come from the same place: no insulation.


The Insulated bottle uses the traditional 'thermos' design of double-walled Stainless with a vacuum in between. It's very effective at keeping water cold - I haven't tried it with hot beverages - and just four ice cubes added in the morning will still be in slivers at lunch. And the wide-mouth design lets those ice cubes fit sideways, which is kind of nice as well.


The trade-off is that the Insulated bottle doesn't have the rolled lip of the standard bottles, which are really nice to drink from. The threads are on the outside of the bottle, instead of the inside, but they're still fairly large and rounded which makes the cap easy to open and secure. Frankly, that's where most of the other bottles that I've tried have fallen down - they're just too fiddly or too fussy to get along with easily. The loop cap has a lower profile than the standard bottle, making the 20oz Insulated slightly shorter - or rather, less tall - than the standard design, but it's sized well for opening with two fingers. That space in the cap is also the only place where condensation will form on humid days.


Kleen Kanteen recommends hand washing, but there's slim chance of that happening with me. The bottle goes into the dishwasher a few times a week, and I'm not about to worry about any cosmetic effects. (The two-year-old standard bottle that I treat the same way shows some wear on the logo, but much less than I expected.) There is a more stern warning about not putting the cap in the dishwasher, as water can be forced into the insulating portion of the lid, so I'm okay with doing that one by hand.


The big surprise to me is that I've managed to put a couple of little dings in the outer wall of the bottle already. The biggest is this one on the bottom, and I have no idea how it happened. I've certainly scuffed up my old bottle, but never dented it despite a couple of decent drops. Otherwise, it's very pretty, with a two-tone brushed finish over most of the bottle, and a high polish on the very bottom. It's overall dimensions are about the same as my 27oz model, and it still fits in standard bike-bottle-sized holders, like the one in the classic MEC pod sling pack.


But getting back to my original concern - does the Insulated bottle usurp the original, or does it fall by the wayside?


The answer, so far, is neither. When I'm only carrying my MEC pod for a little trip around town, the Insulated bottle is an easy choice. If I'm carrying my bigger T2 bag to work on a hot day, I'll carry both. And when I'm not quite willing to carry a spare, and think that the extra 200mL of the standard bottle will make a difference, then I'll just use the higher-capacity one and endure lukewarm water. While I'm currently using the Insulated the most, once the summer's over I'm sure that will shift back. They're both excellent, but make slightly different compromises. It's all good.

2010-07-09

L'Oreal Vive Pro Hair & Body wash


Concept: 3 out of 5
Execution: 2 out of 5
Yeah, but: Shortest. Review. Ever.


The Long Version: The label says it's "hair and body wash" for men. Finally, a shampoo that assumes I'm lazy rather than balding.


2010-07-01

Panasonic Lumix G 20mm f/1.7 Asph


Concept: 3 out of 5
Execution: 3 out of 5
Yeah, but: 'Perfect' can mean 'best compromises', too.


The Long Version: It doesn't look like a monster, but it is: the Lumx G 20/1.7 is perhaps the single best lens available for micro four-thirds cameras. Coupled with the GF1, this little lens has made Panasonic a dominant force in the mirrorless market segment.


Physically, the 20/1.7 is a compact and solid little lens. Its 20mm focal length slightly wider than the traditionally-accepted 'normal' focal length, but in fact it's almost exactly what a normal lens should be - the 4/3 sensor is 22.3mm diagonally. While the whole 'normal' legend is a bit overblown, it does have a remarkably useful field of view. Not so long that there's no context, and not so wide that perspective becomes a special effect. Despite having the 7-14 and 14-140 in my collection - and another eight lenses that mount via adapters - the 20/1.7 is the lens that spends the most time on my GH1 and captures more than half of its photos. I even love the look of it on the camera: I can't help thinking of a little bulldog.


There are several optical tests out there already, and I won't be adding to them since performing any serious optical analysis is far beyond my capabilities and inclination. There's falloff visible to about f/4, and I can confirm that the lens is a bit softer wide open than at f/2.8, with a little less contrast wide-open as well. But sharpness isn't a problem at any aperture, at least until diffraction kicks in, although for absolutely critical work it's worth keeping in mind. Naturally, for absolutely critical work you should also be using a tripod and a cable release. Once that's taken care of, then picking the right aperture becomes significant - until then, use whatever aperture fits the picture.


The actual act of picture-making with the 20/1.7 is a joy. Putting this little gem on my GH1 gives me a strikingly capable camera that only weighs a touch more than the MB-D10 grip for my D700. That's absurd. Image quality that's this good simply shouldn't be capable with such a petite setup. White its autofocus is neither as quick or as quiet as the 14-140, when it's on the camera the 20/1.7 mostly 'goes away' and is effortless to use.


Part of the transparency of using the 20/1.7 is because it's a prime; zoom lenses always require attention from the photographer, and add another decision to the list. After all, a zoom is what you bring when you don't know what you need: there's an inherent element of uncertainty and hedging with them. Photography with a prime lens means that you either do or do not: there is no trying different options. I find that coming back to the 20/1.7 from one of my two zooms always leaves me feeling a little relieved - I know what to expect when it's on the camera.


About the only thing that I really wish was better on the 20mm pancake is its autofocus speed. It's not bad, and I certainly wouldn't call it a 'weakness', but if there was any way to give it the speed and silence of the 14-140 I'd be all over it. The catch is that if it increased the price, then the excellent value of the existing lens might not be preserved - as always, there are compromises to be made.


While the little Panasonic is almost completely resistant to flare, I have been able to provoke it once or twice. Each time has been while photographing at night, with strong lights just outside the frame. Even though a lens hood would be useless, I still wish that there was one available simply to protect the lens. I had to re-learn how to hold the camera to keep my fingers off of it, and spent a lot of time in the first month with smudge marks across the front element. A small metal screw-on hood would be perfect.


The predictability of a prime's field of view is a huge asset. People can be glib and say 'zoom with your feet', but that misunderstands the character of a prime lens. Try this: pick a zoom - a superzoom like the 14-140 is great - and zoom in on a subject that's some distance away from a background with detail. See that the spatial relationships within the frame never change; it's just like cropping an image that's already been taken. Now set that zoom to a single focal length, and see what happens as you physically move closer or farther away. All of the spatial relationships shift; just a few feet of movement can create an entirely different image. If you need an excuse to zip around the room on a wheeled office chair, this is your chance.


So don't think of zoom lenses as being gadgets that bring far things closer. Think of them as tools that let you, the photographer, choose the spatial relationships in your images. They're powerful and versatile, but primes are always going to be easier to use. After all, even if you already know what you want when you walk into a restaurant, you'll probably look through the menu anyway. But I digress.


One thing that I haven't mentioned as an advantage of a prime lens is sharpness - while the 20mm f/1.7 has plenty of it, so do certain zoom lenses, like the 7-14 and 14-45. What the Panasonic pancake provides is better brightness, being more than two stops faster than the fastest m4/3 zoom. That alone would make the 20/1.7 an important lens to use in a format with such generous depth of field, no matter what its focal length or sharpness is like. It's nice that there's no need to compromise.


The 20/1.7 has got to be the best thing that Panasonic has done recently. If it wasn't for such a high-quality little lens on the GF1, the Olympus 17mm f/2.8 - and the cameras that come with it - would have made a much bigger impression on the market. The Pen series are very good cameras, but the 17's only a modest lens, and even a quick comparison comes out in favour of the Panasonic. The system is still new, as is the whole category of mirrorless interchangeable-lens cameras, but I expect the 20/1.7 will be one of the stand-out lenses for a very long time.


(At least, a long time in digital years.)


You may also be interested in the thewsreviews' illustrated collection of observations on a wide assortment of lenses: "Quick Thoughts on Lenses for Micro Four Thirds Cameras".


contact me...

You can click here for Matthew's e-mail address.