2010-07-31

Gordy's Camera Straps


Concept: 3 out of 5
Execution: 3 out of 5
Yeah, but: Is this whole review just an excuse for camera bondage pr0n?


The Long Version: I've always been a bit particular - peculiar? - about how I carry my cameras. I almost always prefer wrist straps, finding it both easier and safer to hand-carry a camera and heavy lens instead of slinging it from a neck strap. And since most commercial wrist straps are either little stringy things with quick-releases for P/S digicams, or made with uber-wide webbing that looks like it wants to be a neoprene cuff bracelet, I've always wound up making them myself from various lengths of cord. They work well, but they look as cheap as they are.


Enter Gordy's Camera Straps.


Gordy's straps are hand-made of quarter-inch leather with waxed polyester binding, and there are four leather colours and ten choices of wrapping cord. If there's more than one piece of material involved, then the colours can be picked individually. There are two main attachment methods, either a string that won't wear down the camera's finish, or a split-ring ('lug') attachment that can use different types of camera-protecing 'bumpers'. The photo above shows the Integral bumper; there are both leather and rubber options that aren't built-in but provide more protection. There's also a tripod-mount attachment for a sling-style strap and a tripod-and-lug vertical attachment, which hangs the camera vertically and looks very cool for rangefinders with an offset tripod mount. Going through Gordy's web site is fun and easy.


The first strap I ordered is a black wrist strap with a black string attachment and red wrapping cord. The leather is fairly stiff right out of the envelope - worldwide shipping is included in the website's prices - but works in nicely. However, it's never going to be as supple as the attachment string, so that's where the flex and movement comes in. As I see it, there are two big advantages to the string: it can't damage the camera's finish, and it makes the strap very thin where it attaches to the camera. For bigger bodies with attachment lugs at the top, like Canon's SLRs and many Nikons, this doesn't matter much. For others, especially ones with smaller bodies and lower lugs, a thick strap will interfere with the grip of a normal human. Panasonic's GH1 almost falls into this camp, and the modern-classic Zeiss Ikon rangefinder is hopeless.


I've used my Ikon with the string wrist strap, but the absence of a protruding grip makes it hard to hand-carry for any length of time. So once I'd seen the quality of Gordy's work, I ordered a single split-ring neck strap with a nearly Zeiss-blue wrapping cord. I was really tempted by the lug-and-tripod vertical design, but since it wouldn't let the camera sit upright, I decided to pass on it no matter how appealing it might seem. The other concern that I had is related to the thickness of the leather at the attachment point, and as I suspected it's too much to let me attach the strap to the right side of the camera. Putting it on the left side solves that particular issue, with an added benefit as well. When I don't want to carry the Ikon over my neck or shoulder, I simply use the strap as a long tether to my right wrist. The rubber O-ring lets me snug it up nicely and makes it perfectly secure. I used to carry the GH1 the same way - on a long shoelace - simply because it keeps the wrist strap from falling across the viewfinder/LCD when I'm using the 'portrait' orientation. Since I still prefer to hand-carry the Ikon when I'm actively using it, the single attachment point absolutely perfect.


Despite the name, I'll almost never put a neck strap around my neck. Our necks aren't really designed to carry heavy weights, and let's face it: a camera looks kind of foolish bouncing off of decidedly non-washboard abs. The moderately rough inner surface of the leather makes it too grippy to sling the camera diagonally, but in exchange the strap does stay where I put it reasonably well. When I'm working with a second camera - typically a digital one that's doing the scouting - my favourite way to carry the Ikon is from my left shoulder, and with the rubber o-ring stopper tightened up it's very secure. I can practically do a callisthenics routine with it carried that way, and when the camera does start to slip a bit, it's close at hand to re-snug.


The length of the straps isn't adjustable - except for one neck strap design - but it can be chosen either from a couple of options (wrist strap) or specified to whatever length you like (neck strap). I have the standard-sized wrist strap and a 45" neck strap, and have been happy with both. I have complete confidence in their strength, and had no problem letting my brand-new Zeiss Ikon dangle from my wrist when it came time to dig out a new roll of film. I will concede that I haven't been using them for very long - expect an update in a few months - but I'm much happier with them than any commercial strap that I've used. Gordy's straps may not have a Billingham-level fit and finish, but they don't have the Artisan and Artist price burden either. I'm a fan of the hand-crafted aesthetic, and really enjoy the personality that they bring to these machines.


There may even be a third one in my future.


2010-07-26

Corrugated Plastic Sheets


Concept: 3 out of 5
Execution: 2 out of 5
Yeah, but: Not to be confused with chloroplast.


The Long Version: I have to admit that I love this stuff. True, like most plastics it's a massive environmental problem and the scourge of marine environments everywhere, and its ubiquity for cheap advertising signs makes it an urban - and suburban - blight as well, but it's also extremely handy. 'Coroplast' is the Xeroxed Kleenex of the corrugated polypropylene copolymer world, and since that's what the sign said where I bought mine, that's what I'll call it here. Other companies do make it, and call it different things, but who has that kind of time?


It's lightweight, rigid, and cheap. Right there we know that politicians and advertisers are going to flock to it, so it's a staple for lawn signs and anything else that needs a weatherproof printed surface. It comes in more colours than a CRT-iMac, and can be used for all kinds of interesting things. There's low-cost greenhouses and office dividers, but also for all kinds of DIY projects like model airplanes and small animal cages. Who knew? But by far the most interesting thing is how handy it is for photography.


I have a large sheet of translucent white Coroplast that I'll use as a background or a diffuser, and a smaller sheet of opaque black that I'll cut up for black cards. My most inspired move was to stack and bundle the black plastic to make a grid for my SB600; the initial proof-of-concept hack job has been so effective that I haven't bothered to make any others. (For anyone who's wondering, it's being held together with my favourite adhesive.) The photo above is being lit by three strobes, with one on the camera and another underneath the white plastic to brighten it up a bit. Thanks to the marvel of Nikon's AWS/CLS speedlight integration - similar abilities can be found in many Olympus cameras and a mighty one Canon product - this is an incredibly easy way to create a simple light box. That's how I took all of the product photos for my 20/1.7 review, like this next one that would have illustrated a part about using the lens with a three-stop ND filter.


The biggest problem with Coroplast can be finding it and getting it home. Most craft and art supply stores in Toronto seem to be selling it these days, and if they don't, there's always sign supply places. The real trick is to find it in pieces smaller than thirty square feet, but the good news is that a simple knife can solve some of the transportation problems. After that, it just takes a couple of light wipes to get rid of the ever-present dust and it's ready to go. It's light, rigid, durable, whiter than foamcore and more cleanable than bristol board. It's not the only thing I need for my home studio, but I use it for a huge amount of the photos that I take for these reviews, even if you can't see it.


2010-07-17

Zuiko Digital ED 40-150mm F4.0-5.6 with MMF-2

Adapter, Lens, and various coverings
Concept: 4 out of 5
Execution: 1.5 out of 5 (0 out of 5 for the MMF-2 alone)
Yeah, but: An odd-ball hybrid, neither fish nor fowl.
The Long Version: Earlier this year, Olympus released a micro four-thirds hardware mash-up consisting of a regular four-thirds kit zoom lens and an adapter for use on the digital Pen E-PL1 (and ostensibly for the E-P1 and E-P2). For the budding Pen lens line, it was a great idea; take an existing 4:1 kit zoom from its standard four-thirds grade lineup, match it with a four-thirds to micro four-thirds adapter, give it an enticing bargain price, then pitch it towards the market segment that would also be interested in purchasing the E-PL1. And that's what Olympus did with the Zuiko Digital ED 40-150mm F4.0-5.6 and the MMF-2 four-thirds to micro four-thirds adapter.


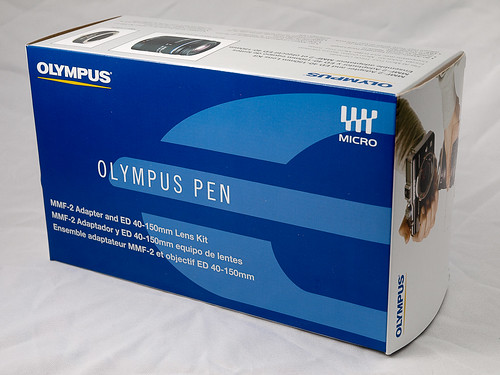
The Big Box that the adapter and lens arrived in

As I said, as a concept, it's great, especially when you consider the costs of the individual items. The zoom lens' official MSRP is $279, while the adapter's official MSRP is $199. The combined cost, if bought from Olympus, would set you back some $380. Olympus sold the two of them together for a mere $199, essentially giving the zoom away with the purchase of the adapter. What probably sealed the deal for Olympus is the fact that the current 40-150mm kit lens was designed to work effectively on Olympus DSLRs (E-4x0, E-5x0, E-6x0 and E-30) using their variant of contrast detect autofocus (CDAF) while those DSLRs were in live view mode.

As the old saying goes, it if sounds to good to be true, it probably is. In this case the too-good-to-be part was the adapter.

MMF-1 vs MMF-2 Top

The original Olympus four-thirds to micro four-thirds adapter (on the left, above), the MMF-1, was released along with the first digital Pen, the E-P1. Like the E-P1 and E-P2, it was a small precision part, manufactured to a high quality standard. Light enough to add little weight-wise to an adapter four-thirds lens, but with enough heft to communicate a feeling of quality, from the metal mount on the front to the metal bayonet on the back, you just knew the MMF-1 was something you could depend on. Not so with the MMF-2.

When the E-PL1 was released, Olympus replaced the MMF-1 with the MMF-2, and for the same price of $199. And that's unfortunate; while the MMF-1 had metal in all the right places, the MMF-2 is totally plastic in construction. After using this combination on my E-P2 for the last three months, I've noticed that a small deformation has formed on the bayonet lock hole. This is the hole into which the mount's lock pin inserts when you twist the lens into place. The deformation is on the side that strikes the pin when the lens comes to a stop. There's only one other spot I've seen this, and its on the zoom lens' plastic bayonet.

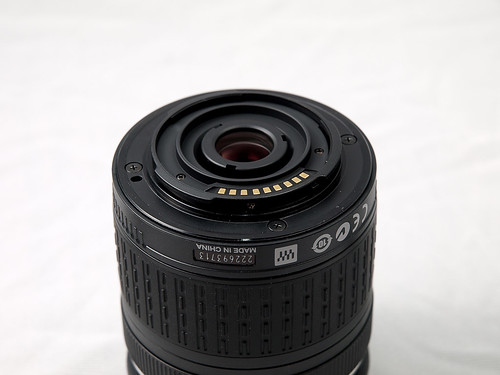
Plastic lens bayonet of the 40-150mm MK II

I'm not against the use of plastic in cameras. Material science has advanced tremendously so that many plastics provide a better, lighter weight, and stronger alternative to metals. The problem is that the type of plastics Olympus chose for this application is inferior to the use of metal. My advice: if you're in the market for just the adapter, then buy Panasonic's DMW-MA1 four-thirds to micro four-thirds adapter. The Panasonic adapter is metal front and back, and can be purchased from most retailers for a little more than $100, or half the price of Olympus' inferior offering.

Moving on to the second item in the combination, we come to the Olympus 40-150mm ED kit zoom lens. This zoom, along with the 14-42/45mm zoom, has been a kit stalwart since the early days, first showing up with the Olympus E-300 (my first four-thirds camera). This version, dubbed unofficially as the Mark 1 version, was solid, a bit large, and gave good performance for what it was; an inexpensive 4:1 telephoto lens for the masses.

But time and technology marched on; when Olympus introduced the E-4x0 and E-5x0 mid-range DSLRs, they revamped both kits to be smaller and lighter, shortening the range of the 14-45mm to 14-42mm, while drastically decreasing the size and weight of the 40-150mm and dropping the max aperture at 40mm from f/3.5 to f/4 in the process. They also added a circular aperture and a single ED glass element. The final result for the 40-150mm was a lens that, when zoomed into 40mm, fit easily into the palm of your hand.

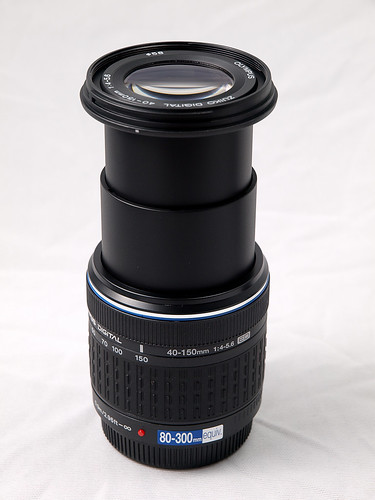
Zoomed out to 150mm it's a different matter; at that focal length the zoom is physically over twice as long as it is at 40mm and a full stop slower at f/5.6. But that's no problem, as the lens is still easy enough to handle, and the front element stays in a fixed position regardless of zoom length or focus distance.

40-150mm MK II fully extended

The 40-150mm is meant to be a "cost efficient" lens, or in an earlier time, a budget lens. And for what it costs in the regular market (around $115), it's probably one of the best little budget zooms you can purchase. But make no mistake, it's a budget lens; the only non-plastic components in the lens are a few bits of metal contacts, the focus motor, and the glass. The rest is spare plastic that has been designed down to a bare minimum.

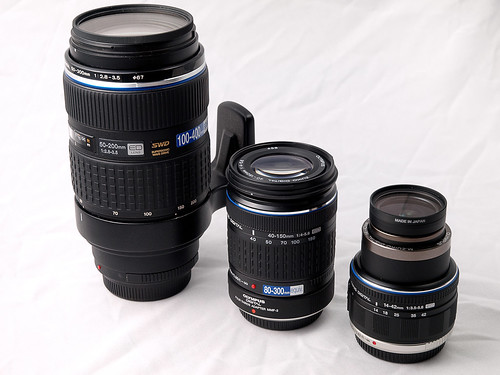
Comparison of three Olympus zooms

In my collection of Olympus glass I'm fortunate to have the outstanding 50-200mm f/2.8-3.5 High Grade zoom lens. Mounted on my E-3, it represents the standard in my personal collection for image quality and general performance. And in that regard the 50-200mm walks all over the 40-150mm. But as you can see in the illustration above, the 50-200mm, on the left, dwarfs both the 40-150mm (center) and the 14-42mm collapsible micro four-thirds kit zoom (right). On size alone, the 40-150mm is the kind of lens you carry with you on impulse; the 50-200mm is the kind of lens you plan to use in advance. And keep in mind the 50-200m costs roughly five times the cost of the 40-150mm and MMF-2 combination, ten times considering the 40-150mm alone.

How well does it perform in real life? Because the 40-150mm is not a native micro four-thirds lens, its autofocus performance is slower than either the 17mm or 14-42mm kit lens, especially at 40mm. Further out into the range up to and including 150mm, the 40-150mm is almost as fast in focus performance as the micro four-thirds standards.

When it comes to optical performance, the 40-150mm provides good (and some may argue excellent) performance for the cost of the lens. It's no 50-200mm, but for what it costs it's more than Good Enough.

Rush Hour Homeward Bound

Urban Section

Oleander after the rain

Two inspect, one waters B&W Cropped

In summary, the two items together fall down a bit, especially if you already have the more upscale E-P2. And that's a shame, really, because the combined size and weight of the two is light enough that it makes a decent companion worth having in the bag.

There are several alternatives to this kit, especially if you're on a tight budget. The first is to look at the Panasonic Lumix G Vario 45-200mm F4-5.6 telephoto zoom lens. The Panasonic is larger and longer than the Olympus combination and the price of the Panasonic is higher, floating between $300 to $350 dollars on the open market. If you want to spend closer to $200, then purchase the Panasonic DMW-MA1 adapter (around $100) along with the Olympus 40-150mm zoom from someone else other than Olympus; Amazon has the Olympus zoom for $130, while B&H Photo has it for $112. The combination of the two separate items, while costing slightly more than the Olympus combination, will give you much better overall quality, especially with regards to the adapter, while preserving the combination's overall compact size.

Update

I should have checked my sources before writing about my dislike of plastic lens mounts. And I should have gone shopping at Walmart. But first things first.

Andrzej Wrotniak has an extensive site devoted to Olympus, including the E series of digital cameras, ranging from the E-1 up to and including the E-P2. In 2007 Wrotniak wrote a review of his own copy of the E-510, in which he noted the fact that the 40-150mm kit zoom, the same version written about above, had been introduced with the E-510 and had a plastic mount. Wrotniak had this to say about plastic mounts:
Nothing, however, comes free. To trim the weight, Olympus engineers had to reduce the use of metal in these lenses, up to using plastic lens mounts. While something makes me to abhor this very idea, I understand the reasons behind it: attaching a metal bayonet to a totally plastic construction would only move the point of mechanical vulnerability from the bayonet itself to the screws securing it to the rest of the lens. Anyway, only time will tell how does the plastic mount affect long-term reliability and precision of these lenses.

To be impartial: almost all other manufacturers (except for Pentax) have been using plastic mounts in their "kit" lenses for a few years already; Olympus was, as far as I know, the next-to-last Mohican.
And sure enough, while shopping for groceries at a near-by Walmart, I cruised by the electronics section (to satisfy the inner geek) before hitting the grocery side. And right there, in the small camera section, were two zoom lenses, one from Nikon (Nikon 55-200mm f/4-5.6G IF-ED AF-S DX VR) and one from Canon (EF-S 55-250mm f/4-5.6 IS), both with plastic mounts.

So I guess I should get over my bias towards plastic lens mounts, especially in Olympus, since "everybody is doing it." But I still stand by my assessment of the MMF-2. If you can find the Panasonic adapter for around $100, then buy it over the Olympus.

contact me...

You can click here for Matthew's e-mail address.