2013-02-25

Propel RC Stealth Flyer II


Concept: 2 out of 5
Execution: 4 out of 5
Yeah, but: Never too late for a happy kidhood.

The Long Version: Driving around in circles is just pretty dumb, and that's where all of my radio-controlled car purchases have ended up. So I've mostly learned to resist the siren call of toys that would amuse a 12-year-old, no matter how much I think I would really like one, and have missed out on the whole remote-controlled helicopter thing until now.

Concept: 2 out of 5
Execution: 4 out of 5
Yeah, but: Never too late for a happy kidhood.

The Long Version: Driving around in circles is just pretty dumb, and that's where all of my radio-controlled car purchases have ended up. So I've mostly learned to resist the siren call of toys that would amuse a 12-year-old, no matter how much I think I would really like one, and have missed out on the whole remote-controlled helicopter thing until now.

Penny went to Radio Shack and bought me the "Propel RC Stealth Flyer II" – hereafter 'toy helicopter' – for Christmas. This is a small and simple toy, being seven inches nose-to-tail with a six inch rotor span, weighing nothing, and with only throttle and direction controls. There's no ability to hover or control its speed, and it invariably turns quickly in one direction and slowly in the other, so even that expectation of left-right control is somewhat illusory. This is not a precision machine.


But complexity is not a prerequisite for enjoyment. The toy helicopter gives just enough control to influence its actions but not enough to be accountable for the results. When it crashes – and it will crash, and often – it's just an amusing little wince, and when a flight ends in a wheels-down landing I feel a completely unjustified sense of accomplishment.

The toy helicopter has a surprising amount of power, so it's very easy to over-do the throttle and send it crashing into something. Even a measured and controlled flight is likely to involve impacts, and I'm continually amazed at the incredible durability of this toy. It routinely sucks itself into the ceiling – the opposite of ground effect – and then tumbles to the floor, and/or crashes into walls, and seems to have a magical attraction to the back of the couch. I've worn the paint from its nose and scoured the top pair of rotor blades, but it still flies like a champ.


The easiest way to launch the helicopter is to hold it by the tail and run up the rotors until it's stable and generating enough lift to hold itself up. It's very easy to over-do the throttle, so this allows a measured beginning. This works best when the L/R trim controls have been adjusted for straight flight, because it does take a second or two to have both hands back on the remote.

Taking off from a hard, smooth surface is challenging. Despite the twin counter-rotating propellers the helicopter will still torque itself around and end up heading off in an unexpected direction. Couple that with the extra bolt of power needed to get airborne, and the necessity of throttling down in anticipation of its slow reaction times, and it's likely to end in tragedy. Or in amusement, depending on your perspective.


Launching from an upholstered surface that keeps the helicopter facing forward helps tremendously. One of the challenges that I set myself is to start from my desk chair, fly across the dining room, maybe throw in a quick circle of the living room, and then land on the couch. In the fifteen or twenty short flights that I manage on a charge maybe one will end in triumph, while the rest end in amusement.

The helicopter recharges by tethering it to the controller; the infrared controller runs on six AA batteries, and they last a surprisingly long time. As the helicopter's power runs down it gradually loses the ability to lift itself, so there's plenty of warning that it needs to recharge. By then it's usually time to put it away before someone gets hurt, so it's all for the best.


A nice touch with the helicopter is that it has white and blue LED running lights on the nose and tail, respectively, which makes it a lot of fun to fly in dimmer light. They're also quite practical, as otherwise it can be tough to see which way the helicopter is facing from one moment to the next. And given how quickly it can spin this can be very important.

The LED lights have another practical application as well. To sync up properly the helicopter needs to be turned on before the controller; when they're communicating the `copter's rear blue LED gives three quick flashes and then continues to blink. If the helicopter's unresponsive and the lights are solid, just flip the controller off and on again. Propel RC gets bonus points for combining 'fun' with 'functional' – how often does that happen for inexpensive electronic toys?


The toy helicopter is surprisingly loud; I can only use it when Penny's not home because just hearing it from another room – whirring away and abruptly crashing into things – stresses her out. The abrupt ends of each flight can be a little intimidating, but the combination of hinged rotor blades and extremely light weight means that the helicopter has yet to break anything. And yes, I've flown it into myself on occasion, and while it doesn't tickle, it also doesn't cut or bruise. The key is to cut power when there's an impending impact and let the helicopter fall where it may.

This toy helicopter has struck – if you'll pardon the pun – an excellent balance. It's durable and powerful enough to enjoy, and not so expensive that I'm concerned about hurting it. It gives enough control to be fun but not enough to be the helicopter equivalent of the predictability of driving around in circles. It's one of those rare times that something "better", in whatever way that means, probably wouldn't be an actual improvement. Two months after Christmas I'm still using and enjoying it, which is pretty awesome for a toy that's meant for a twelve-year-old.


last updated 25 feb 2013

Penny went to Radio Shack and bought me the "Propel RC Stealth Flyer II" – hereafter 'toy helicopter' – for Christmas. This is a small and simple toy, being seven inches nose-to-tail with a six inch rotor span, weighing nothing, and with only throttle and direction controls. There's no ability to hover or control its speed, and it invariably turns quickly in one direction and slowly in the other, so even that expectation of left-right control is somewhat illusory. This is not a precision machine.


But complexity is not a prerequisite for enjoyment. The toy helicopter gives just enough control to influence its actions but not enough to be accountable for the results. When it crashes – and it will crash, and often – it's just an amusing little wince, and when a flight ends in a wheels-down landing I feel a completely unjustified sense of accomplishment.

The toy helicopter has a surprising amount of power, so it's very easy to over-do the throttle and send it crashing into something. Even a measured and controlled flight is likely to involve impacts, and I'm continually amazed at the incredible durability of this toy. It routinely sucks itself into the ceiling – the opposite of ground effect – and then tumbles to the floor, and/or crashes into walls, and seems to have a magical attraction to the back of the couch. I've worn the paint from its nose and scoured the top pair of rotor blades, but it still flies like a champ.


The easiest way to launch the helicopter is to hold it by the tail and run up the rotors until it's stable and generating enough lift to hold itself up. It's very easy to over-do the throttle, so this allows a measured beginning. This works best when the L/R trim controls have been adjusted for straight flight, because it does take a second or two to have both hands back on the remote.

Taking off from a hard, smooth surface is challenging. Despite the twin counter-rotating propellers the helicopter will still torque itself around and end up heading off in an unexpected direction. Couple that with the extra bolt of power needed to get airborne, and the necessity of throttling down in anticipation of its slow reaction times, and it's likely to end in tragedy. Or in amusement, depending on your perspective.


Launching from an upholstered surface that keeps the helicopter facing forward helps tremendously. One of the challenges that I set myself is to start from my desk chair, fly across the dining room, maybe throw in a quick circle of the living room, and then land on the couch. In the fifteen or twenty short flights that I manage on a charge maybe one will end in triumph, while the rest end in amusement.

The helicopter recharges by tethering it to the controller; the infrared controller runs on six AA batteries, and they last a surprisingly long time. As the helicopter's power runs down it gradually loses the ability to lift itself, so there's plenty of warning that it needs to recharge. By then it's usually time to put it away before someone gets hurt, so it's all for the best.


A nice touch with the helicopter is that it has white and blue LED running lights on the nose and tail, respectively, which makes it a lot of fun to fly in dimmer light. They're also quite practical, as otherwise it can be tough to see which way the helicopter is facing from one moment to the next. And given how quickly it can spin this can be very important.

The LED lights have another practical application as well. To sync up properly the helicopter needs to be turned on before the controller; when they're communicating the `copter's rear blue LED gives three quick flashes and then continues to blink. If the helicopter's unresponsive and the lights are solid, just flip the controller off and on again. Propel RC gets bonus points for combining 'fun' with 'functional' – how often does that happen for inexpensive electronic toys?


The toy helicopter is surprisingly loud; I can only use it when Penny's not home because just hearing it from another room – whirring away and abruptly crashing into things – stresses her out. And as my audio recording of the helicopter attests, the abrupt ends of each flight can be a little intimidating, but the combination of hinged rotor blades and extremely light weight means that the helicopter has yet to break anything. And yes, I've flown it into myself on occasion, and while it doesn't tickle, it also doesn't cut or bruise. The key is to cut power when there's an impending impact and let the helicopter fall where it may.

This toy helicopter has struck – if you'll pardon the pun – an excellent balance. It's durable and powerful enough to enjoy, and not so expensive that I'm concerned about hurting it. It gives enough control to be fun but not enough to be the helicopter equivalent of the predictability of driving around in circles. It's one of those rare times that something "better", in whatever way that means, probably wouldn't be an actual improvement. Two months after Christmas I'm still using and enjoying it, which is pretty awesome for a toy that's meant for a twelve-year-old.


last updated 25 feb 2013

2013-02-18

Nikon 1 V1, Part 3


Concept: 2 out of 5
Execution: 2 out of 5
Yeah, but: Adequate verging on sufficient.

The Long Version: Welcome to the third instalment of my overly-long-running review of the obsolete Nikon 1 V1. Part one was mostly getting the negatives out of the way, while part two took a sunnier view on things. Now it's finally time to look at the image quality of the camera that I've nicknamed "that stupid f'cking little piece of sh't". But don't read too much into that – I give affectionate nicknames to many of my cameras.

The first thing you need to know about image quality is that the V1 really wants to have a shutter speed of 1/30s, and won't increase its iso sensitivity to go faster than that. This is fine for the 10-30mm, and almost acceptable with good technique with the 30-110mm, as they both have in-lens image stabilization. The unstabilized 10mm f/2.8 should also be good with this – I don't own it to test – but the camera isn't clever enough to boost its minimun shutter speed with the 18.5mm, which is a 50mm-equivalent.

Let me tell you, 1/30 at 50mm isn't nearly fast enough to avoid camera shake with this lightweight little LCD-based camera. And this isn't just a 'low light' thing – I've run into its limitations on a cloudy day. This camera can't be trusted to do its own thing, and needs to be actively managed.


I'm generally happy with the V1 up to about iso800, which looks a little like iso6400 on my D800, but iso400 and under does create a significantly better file. I've printed the Rubbermaid photo above, taken at iso1000, as an 18x12, and it shows noise and artifacts under critical examination. Especially for higher iso settings, the modest per-pixel image quality makes low-DPI prints and uprezzing more difficult than usual. Yes, plenty of people make big prints from low-resolution cameras, but noise and noise removal – even with raw files – will make marginal prints from the V1 break up and look digital in a bad way.

On the other hand, the shipping container photo below, at a functionally identical iso900, passed scrutiny that's much more incisive than mine at the same size. Content matters tremendously, and it's overly simplistic to set an absolute limit on what will and won't be satisfactory ahead of time. My lesson from this is to use the shutter speed and aperture that the camera and photo requires, respectively, and let the iso sort itself out. Yes, this sometimes leads to disappointment, but I'd rather have a noisy photo than a blurry one, or worse, no photo at all.

But for web-sized images or snapshots none of this really matters. Properly managed, with the camera forced to use a sensible shutter speed and a reasonable iso setting, the V1's image quality is actually pretty decent. Coupled with its small lenses the V1 is a great camera for wandering around the city with, and I wouldn't feel foolish carrying it as my only camera for any multi-day trip that doesn't have photography as its primary goal.


The V1 lacks the modern nicety of having lens distortion correction built into the camera, and all of the lenses would benefit from it. Fortunately both Lightroom and DxO Optics, the two programs I use, support most of the 1's lenses. I'm just waiting for the 18.5mm lens to be supported, and when that finally catches up then I'll never hesitate to use it.

As a three-lens kit the V1 with the 10-30, 30-110, and fast normal 18.5mm prime makes for a flexible combination. Of the three the 30-110 is my favourite, and it seems to be a bit better than the 10-30, but really all of them are about as good as the camera. That's not a ringing endorsement, it's true, but this isn't an inherently exciting system.

Even at 'only' 10 megapickles, the V1's pixel density would make for a 74Mpx full-frame sensor, so designing appropriately small and inexpensive lenses is a major accomplishment. I've rounded out my lens options by adding the FT-1 adapter to my kit, and can't say that even the best F-mount lenses really blow me away on the V1, either. More on that in yet another review instalment, but for now the short version is that the 1-system lenses are fine.


When compared to recent cameras its image quality offers few surprises. It's generally better than smaller compact cameras that cost about the same amount of money as the 1V1's fire-sale prices, and not as good as larger-sensored cameras that cost more. And despite all of my griping, it actually compares quite favourably to older cameras that I've used extensively, such as the Olympus E-3 or Panasonic GH1, which remain some of the better 4/3 sensors out there.

The V1's image quality is good enough for pretty much everything that I usually do, so I know I'll have generally decent results from it, but it's tough being the little brother to a D800. The V1 is the camera that I carry when I'm carrying something else, whether it's a bigger camera that will benefit from the V1's small size and zoom lenses, or my audio kit that benefits from its silence.

So despite being deeply flawed as a photo-taking device, the reality is that the V1 makes an excellent sidekick, and there isn't a camera out there that would be a better match for my needs. Yes, that's a little sad in many ways, but that's just the way it is some times.


last updated 18 feb 2013

2013-02-16

Sigma 19mm and 30mm F2.8 EX DN E-Mount Lenses, Part 1

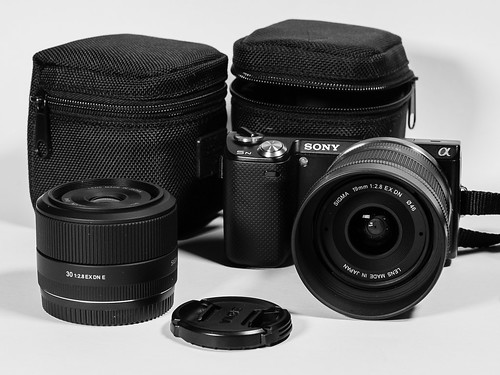
NEX-5N with Sigma 30mm and 19mm
Concept: 3 out of 5
Execution: 3 out of 5
Yeah, but: Never look a pair of gift lenses in the aperture.

The Long Version: I've been carrying two unique mirrorless camera systems for a while now. The first is µ4:3rds consisting of my µ4:3rds cameras (E-P2, E-PL1, E-PL2, and the OM-D E-M5) as well as a fair number of µ4:3rds lenses, some of which I've reviewed on this site. The other mirrorless camera system I've been carrying since late last year has been the Sony NEX, specifically the NEX-5N, which I picked up when it dropped precipitously in price right before the NEX-5R was announced (it has risen a bit in price since then).

So why did I buy the NEX-5N with all those other Olympus Pens lying about? Curiosity mainly. When I saw the low, low price of the 5N plus kit zoom, I figured the price was low enough to give the NEX a tryout. If it turned out bad I'd resell it and go on about my business. But the 5N turned out to be pretty good actually and so I kept it around. With regards to video it's turned out something close to phenomenal (but that's a review for another time).

Unlike the µ4:3rds system, I held back purchasing any other equipment for the camera beyond the 18-55mm kit lens the 5N was sold with. I wanted to investigate what the 5N was capable of on its own merits before making any kind of equipment expansion. While I was somewhat interested in the Sigma lenses when they were released for their still photography potential on the 5N, I was growing more interested in the 5N for its video capabilities and found the kit zoom to be more than adequate for my very modest video needs.

After their announcement the Sigma lenses began an inexorable slide in price, first down to $200/lens, then $150. Sometime around late January Sigma bundled both of them together for $199 ($99.50 each), which made the lenses irresistibly attractive to a cheapskate like me, so I bought them.

The bundle price was for both the µ4:3rds as well as E-mount versions. As luck would have it, the µ4:3rds sold out fairly quickly (that's where a good majority of the mirrorless camera enthusiasts seem to be) leaving plenty of E-mount lenses for the NEX system. I wouldn't have purchased the µ4:3rds versions because I already have those focal lengths pretty well covered with other lenses I own. From my perspective the 19mm and 30mm lenses make a lot more sense on the NEX body with its APS-C sensor; the 19mm gives an equivalent focal length of 28.5mm and the 30mm an equivalent focal length of 45mm. In other words, decent wide angle and normal primes.

The Problem With These Lenses

Before you go run off and buy copies of your own, you need to know the following:
  1. These particular lenses have been discontinued, which is why they've been chopped down in price so much. Sigma has officially stated that they will be replaced with "Art" versions of these lenses in the future. And if it's an Art lens, it will cost more.
  2. These lenses do not have built-in image stabilization. That means you'll need to work on your "camera technique", another way of saying you'll have to learn how to hold your camera steady in low light when aperture and ISO won't buy you a high enough shutter speed to be indifferently held. Tripods come to mind.
And Why You'll Buy Them Anyway

None of this will bother the true budget photographer. You'll purchase your copies, appreciate their value where others might not, and learn to use them regardless. While it could be argued their introductory MSRP might have been a tad too high, they're certainly worth what they're selling for now, which is one important reason I rate them as highly as I do.

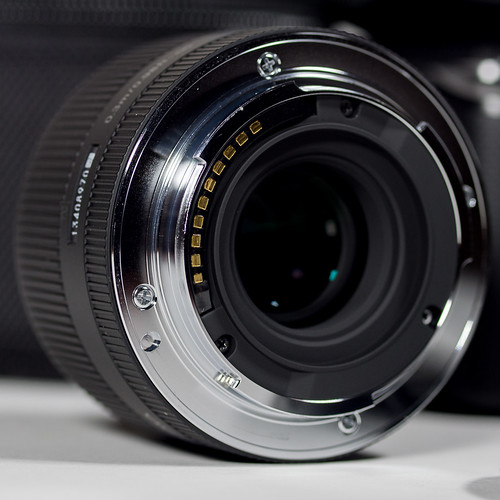
The 19mm and 30mm have features which their more costly cohorts from other manufacturers lack at this price point, such as metal bayonets and lens hoods (at least a lens hood for the 19mm).

Sigma 30mm Metal Mount

Both lenses use plastics quite heavily in their makeup, and both are blessed with quality metal bayonets. When I say they use plastics quite heavily, I mean that they spare nothing in the construction of the lens, especially the lens barrel itself. Both lenses are well-built and exude a level of fit and finish above their station.

And they are wonderfully black. I am so tired of seeing and/or buying silver and silvered lenses from Olympus and Sony. I hail from the Jurassic film period of 35mm photography, where every manly lens was metal and black anodized, with etched lettering everywhere. In these modern times the black anodized and etched metal has given way to industrial plastics with silk-screened lettering. I may grouse about the use of such, but I will at least grant that Sigma's use of silk-screened plastics is better than most (I'm looking at you Olympus and Sony).

Fitting one of these primes on the 5N produces a compact and enjoyable little camera system. The matte black finish of the Sigma lenses blends beautifully with the semi-gloss black finish of the 5N. The physical handling of the combination is superb. The operational handling (focusing and picture taking) is as good as the kit zoom. And this is why I like to have one or the other prime on the 5N instead of the zoom for still photography; at f/2.8, either lens' maximum aperture is 2/3rds to two stops wider than the kit lens at equivalent focal lengths. That's great for low-light photography.

Because the Sigma primes are black and smaller than the kit zoom, the overall combination is easier to carry and more inconspicuous in use. Even if you carry both primes with you (which I do), the total space occupied with the two primes plus the 5N is no more than the 5N with the kit zoom mounted. In practice I carry one prime in one pocket and the 5N with the other prime mounted slung over my shoulder or stuck in another jacket pocket.

That's it for now. In part two I will speak a bit more of their operation as well as display soul-searing (or is it eye-searing?) images made with the pair and the NEX-5N. In the mean time I leave you with this haunting image I made of poor Ruby, my yellow Lab, using the Sigma 30mm and the NEX-5N.

Not Another Damn Photo Test
Oh, hell, not another test photo of me?
One day you're going to stick a camera in my face and
I'm going to grab it from you and bury it in the back yard
where you can't find it.

Technical

The hero photo at the top and the middle lens mount detail photo were taken with the Olympus E-M5 and the Zuiko Digital 50mm macro with the Olympus MMF-1 adapter. I used a pair of Fotodiox LED 312AS panels for lighting (thank you Kirk Tuck). Being lazy, I used the E-M5 instead of the E-1. And I mean lazy in that I didn't want to sit the camera on its tripod, use base ISO, and a very slow non-hand-holdable shutter speed. I hand-held the E-M5 and let it choose very high ISOs for both images (2500 for the top and 640 for the bottom). I have now put the E-1 away, and have no idea if I'll ever go back to it again.

last updated 16 feb 2013

contact me...

You can click here for Matthew's e-mail address.